เรียน NodeJS Back-End เชื่อมต่อ EJS HTML CSS Front-End Developments

ต้องผ่านการเรียนทั้ง 3 บทเรียนนี้ก่อน ถึงจะสามารถเรียนบทเรียนนี้ได้
1. เรียน NodeJS Back-End Developers (เริ่มสร้าง Back-End Development)
https://www.glurgeek.com/education/startnodejs
2. Figma ออกแบบเว็บไซต์ สำหรับ Front-End Designers (เตรียม Front-End Design)
https://www.glurgeek.com/education/figmawebdesigner
3. Figma ออกแบบเว็บไซต์ สำหรับ Front-End Designers (เตรียม Front-End Development)
https://whttps://www.glurgeek.com/education/htmlcssdesigntodev
เมื่อผ่านทั้ง 3 บทเรียนข้างต้นแล้ว มาเริ่มเรียนรู้บทเรียนที่ 4
4. เรียน NodeJS Back-End เชื่อมต่อ EJS HTML CSS Front-End Developments (เขียนให้ Back-End เชื่อมต่อ Front-End Developments)
https://www.glurgeek.com/education/startnodejsandfrontend
5. เชื่อมต่อตัวแปรของ Back-End NodeJS กับ Front-End EJS
ทำต่อจากหัวข้อที่ 4 ของบทเรียนที่ 1 เรียน NodeJS Back-End Developers
https://www.glurgeek.com/education/startnodejs
1) ไฟล์ nodeserver.js
เพิ่ม Code บรรทัดที่ 8 – 13 สร้างตัวแปรแบบเก็บข้อมูลรายการ
//Add Variables
var user_list = [
    { name: "Nester", address: "BKK", birth_year: 2003},
    { name: "Annie", address: "PKT", birth_year: 1999},
    { name: "Winner", address: "CNX", birth_year: 2022}
];
เพิ่ม Code บรรทัดที่ 26 กำหนดตัวแปร obj_user_list : user_list ที่จะส่งไปหาไฟล์ index.ejs ที่เป็น Front-End
//New Font-End EJS Show HTML Display
app.get("/",(req,res) =>{
    res.render('index', {userid : id, status : status,
        obj_user_list : user_list})
})
2) ไฟล์ index.ejs
เพิ่ม Code บรรทัดที่ 15 – 19 ทำการแสดงตัวแปรรายการไปแสดงออกทางหน้า Website
<% … %> เป็นเครื่องหมายสำหรับทำให้ JavaScript Variables ทำงานได้ใน HTML Tag
<% obj_user_list.forEach(function(user_list){ %>
        <p><%= user_list.name %>
           <%= user_list.address %>
           <%= user_list.birth_year %></p>
    <% }) %>

3) เปิด Terminal รัน Server พิมพ์คำสั่ง nodemon nodeserver.js

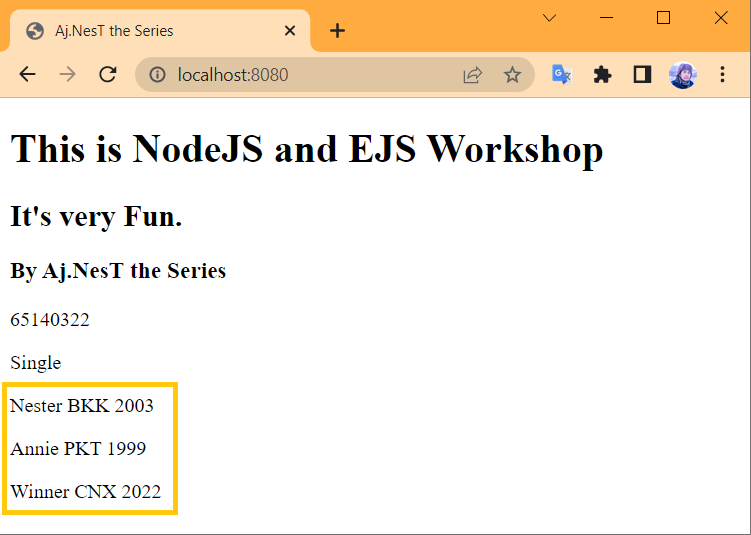
4) ได้ผลลัพธ์ แสดงข้อมูลรายการที่สร้างขึ้น
6. เชื่อมต่อ Back-End NodeJS กับ Front-End HTML CSS Website
1) ใน VS Code สร้าง Folder ใหม่ ชื่อ public
2) ลากไฟล์ของ Front-End Website ที่สร้างขึ้นมาใส่ในส่วนของ Back-End NodeJS
(ส่วนของ Front-End ต้องทำให้เสร็จก่อน ศึกษาได้จาก https://www.glurgeek.com/education/htmlcssdesigntodev/ )
สามารถดาวน์โหลดได้ทาง https://github.com/ajnesttheseries/htmlcssfontend
2.1 Folder ชื่อ image และไฟล์ styles.css ลากมาใส่ใน public
2.2 ไฟล์ index.html ลากมาใส่ใน Folder ชื่อ views

2.3 แก้ไขชื่อไฟล์ index.html เป็น index2.ejs เพราะต้องใช้นามสกุล .ejs

3) ทำการเชื่อมต่อไฟล์ Back-End NodeJS และ Front-End EJS (HTML CSS Website) ให้รู้จักกัน
3.1 ในไฟล์ nodeserver.js เพิ่ม Code บรรทัดที่ 33 – 36 ทำให้เรียกใช้งานไฟล์ index2.ejs ได้
//Connect index2.ejs
app.get("/index2",(req,res) =>{
    res.render('index2')
})
3.2 เพิ่ม Code บรรทัดที่ 19 – 20 ทำให้สามารถเข้าไปใช้งาน Folder ชื่อ public ซึ่งเป็น images และไฟล์ CSS
//Connect public folder
app.use(express.static('public'))

4) ทำการรัน Server ใน Terminal พิมพ์ nodemon nodeserver.js
5) เปิด Browser http://localhost:8080/index2 ได้ผลหน้า Web Application ดังรูป

7. สร้าง Parameters ตัวแปรส่งข้อมูลเชื่อมต่อ Back-End NodeJS กับ Front-End HTML CSS Website
ฝั่ง Back-End NodeJS ไฟล์ nodeserver.js
1) ในไฟล์ nodeserver.js เขียนโปรแกรมสร้าง Parameters ตัวแปรสำหรับส่งข้อมูล Back-End ไปยังหน้า Front-End Website
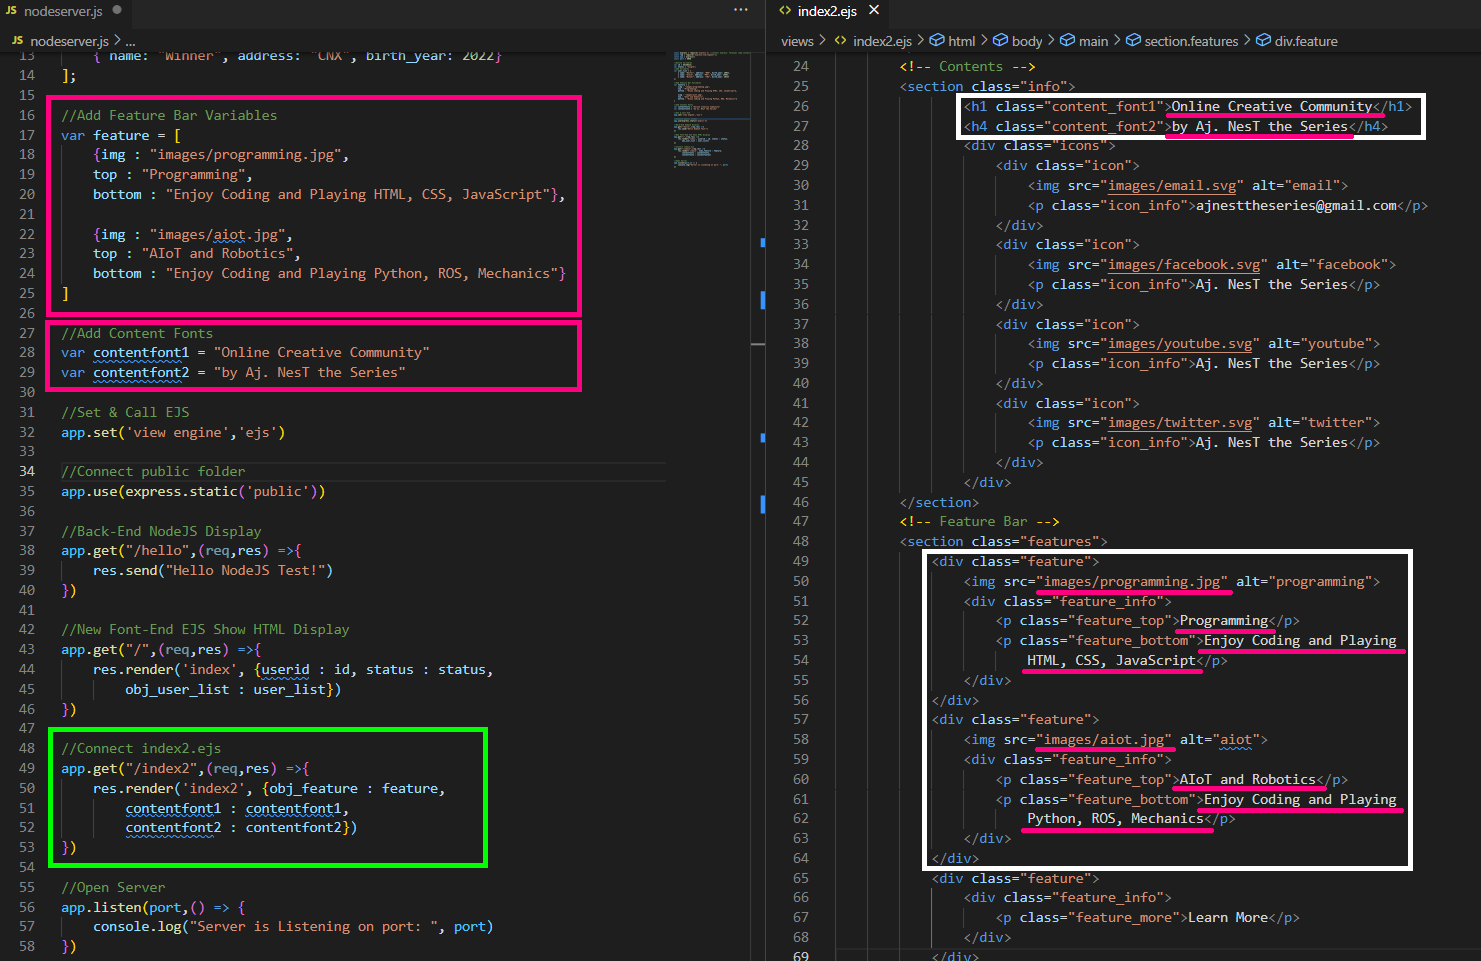
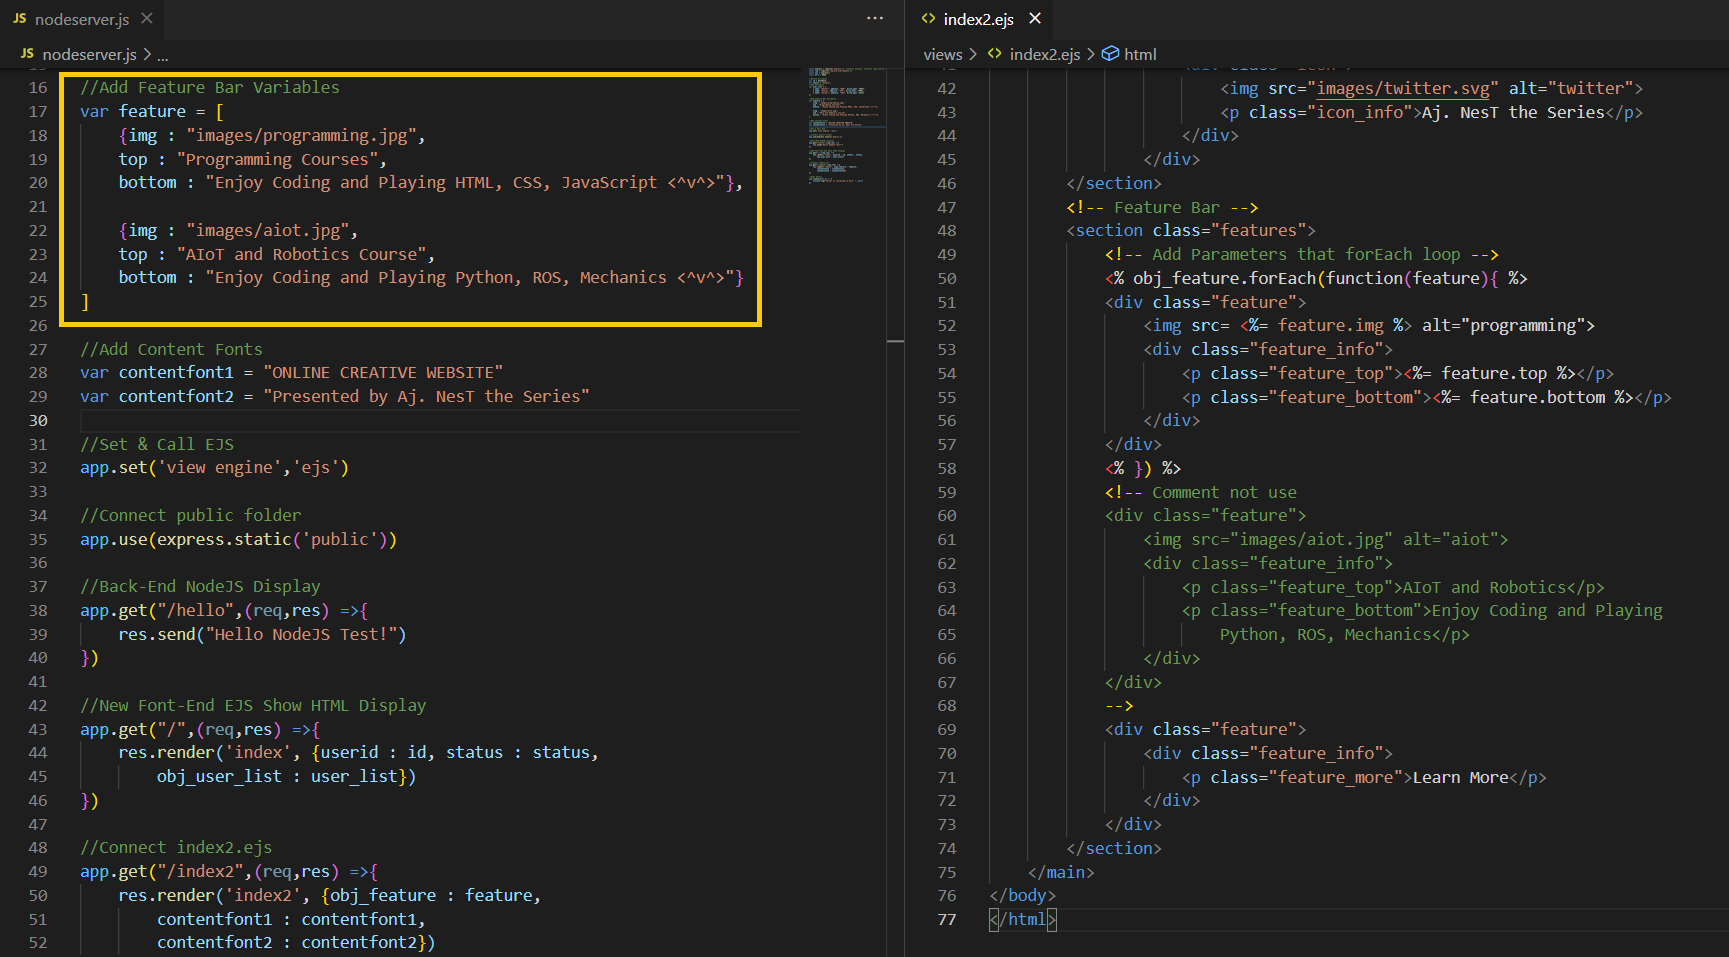
1.1 เพิ่ม Code บรรดทัดที่ 16 – 25 สร้างตัวแปร feature และกำหนดค่าข้อมูลสำหรับควบคุมส่วน Feature Bar ของหน้า HTML ไฟล์ index2.ejs
//Add Feature Bar Variables
var feature = [
    {img : "images/programming.jpg",
    top : "Programming",
    bottom : "Enjoy Coding and Playing HTML, CSS, JavaScript"},

    {img : "images/aiot.jpg",
    top : "AIoT and Robotics",
    bottom : "Enjoy Coding and Playing Python, ROS, Mechanics"}
]
1.2 เพิ่ม Code บรรทัดที่ 27 – 29 สร้างตัวแปร contentfont1 และ contentfont2 และกำหนดค่าข้อมูลสำหรับควบคุมส่วน Contents ของหน้า HTML ไฟล์ index2.ejs
//Add Content Fonts
var contentfont1 = "Online Creative Community"
var contentfont2 = "by Aj. NesT the Series"
1.3 เพิ่ม Code บรรทัดที่ 50 – 53 สร้างตัวแปร obj สำหรับให้แสดงในไฟล์ HTML index2.ejs
//Connect index2.ejs
app.get("/index2",(req,res) =>{
    res.render('index2', {obj_feature : feature,
        contentfont1 : contentfont1,
        contentfont2 : contentfont2})
})
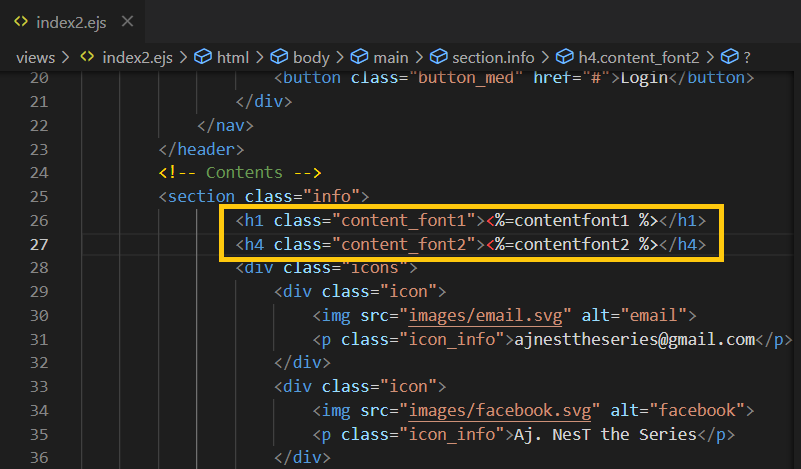
2) ในไฟล์ index2.ejs ทำการแก้ไข Code บรรทัดที่ 26 – 27 ใส่ค่าตัวแปร contentfont1 และ contentfont2
<h1 class="content_font1"><%=contentfont1 %></h1>
<h4 class="content_font2"><%=contentfont2 %></h4>
3) ทดลองรัน Server แสดงหน้า Web Application http://localhost:8080/index2
4) ในไฟล์ nodeserver.js ทำการเปลี่ยนค่าข้อมูลของตัวแปร contentfont1 และ contentfont2
แก้ไข Code บรรทัดที่ 28 – 29
//Add Content Fonts
var contentfont1 = "ONLINE CREATIVE WEBSITE"
var contentfont2 = "Presented by Aj. NesT the Series"

5) ทดลองรัน Server เปิดหน้า Web Application จะทำการแสดงผลข้อมูลใหม่เกิดขึ้น http://localhost:8080/index2

ฝั่ง Front-End EJS ไฟล์ index2.ejs
6) ในไฟล์ index2.ejs ทำการใส่ตัวแปรสำหรับรับค่า Parameters ของส่วน Feature Bar
แก้ไข Code บรรทัดที่ 50 – 55
<% obj_feature.forEach(function(feature){ %>
<%= feature.top %>
<%= feature.bottom %>
<!-- Feature Bar -->
        <section class="features">
            <!-- Add Parameters that forEach loop -->
            <% obj_feature.forEach(function(feature){ %>
            <div class="feature">
                <img src= <%= feature.img %> alt="programming">
                <div class="feature_info">
                    <p class="feature_top"><%= feature.top %></p>
                    <p class="feature_bottom"><%= feature.bottom %></p>
                </div>
            </div>
            <% }) %>
            <!-- Comment not use
            <div class="feature">
                <img src="images/aiot.jpg" alt="aiot">
                <div class="feature_info">
                    <p class="feature_top">AIoT and Robotics</p>
                    <p class="feature_bottom">Enjoy Coding and Playing
                        Python, ROS, Mechanics</p>
                </div>
            </div>
            -->
            <div class="feature">
                <div class="feature_info">
                    <p class="feature_more">Learn More</p>
                </div>
            </div>
        </section>

7) แสดงผลการรันหน้า Web Application http://localhost:8080/index2
8) ทดลองแก้ไขค่าข้อมูลของตัวแปร feature ในไฟล์ nodeserver.js
แก้ไข Code บรรดทัดที่ 19, 20, 23 และ 24
//Add Feature Bar Variables
var feature = [
    {img : "images/programming.jpg",
    top : "Programming Courses",
    bottom : "Enjoy Coding and Playing HTML, CSS, JavaScript <^v^>"},

    {img : "images/aiot.jpg",
    top : "AIoT and Robotics Course",
    bottom : "Enjoy Coding and Playing Python, ROS, Mechanics <^v^>"}
]
9) แสดงผลการรันหน้า Web Application ใหม่ http://localhost:8080/index2

ไฟล์ nodeserver.js สำหรับใช้การเรียน
const express = require('express'); //install express: Terminal >npm install express --save
const req = require('express/lib/request');
const app = express()
const port = 8080
//Define Variables
var id = 65140322;
var status = "Single";
//Add Variables
var user_list = [
{ name: "Nester", address: "BKK", birth_year: 2003},
{ name: "Annie", address: "PKT", birth_year: 1999},
{ name: "Winner", address: "CNX", birth_year: 2022}
];
//Add Feature Bar Variables
var feature = [
{img : "images/programming.jpg",
top : "Programming Courses",
bottom : "Enjoy Coding and Playing HTML, CSS, JavaScript <^v^>"},
{img : "images/aiot.jpg",
top : "AIoT and Robotics Course",
bottom : "Enjoy Coding and Playing Python, ROS, Mechanics <^v^>"}
]
//Add Content Fonts
var contentfont1 = "ONLINE CREATIVE WEBSITE"
var contentfont2 = "Presented by Aj. NesT the Series"
//Set & Call EJS
app.set('view engine','ejs')
//Connect public folder
app.use(express.static('public'))
//Back-End NodeJS Display
app.get("/hello",(req,res) =>{
res.send("Hello NodeJS Test!")
})
//New Font-End EJS Show HTML Display
app.get("/",(req,res) =>{
res.render('index', {userid : id, status : status,
obj_user_list : user_list})
})
//Connect index2.ejs
app.get("/index2",(req,res) =>{
res.render('index2', {obj_feature : feature,
contentfont1 : contentfont1,
contentfont2 : contentfont2})
})
//Open Server
app.listen(port,() => {
console.log("Server is Listening on port: ", port)
})
ไฟล์ index2.ejs สำหรับใช้ในการเรียน
<!DOCTYPE html>
<html>
<head>
    <meta charset="UTF-8">
    <meta http-equiv="X-UA-Compatible" content="IE=edge">
    <meta name="description" content="profile">
    <meta name="viewport" content="width=device-width, initial-scale=1.0">
    <title>GlurGeek Website</title>
    <link rel="stylesheet" href="styles.css">
</head>
<body>
    <main>
        <!-- Navigation Bar -->
        <header>
            <nav>
                <img class="logo" src="images/logo.svg" alt="logo">
                <div class="links">
                    <a href="#">About</a>
                    <a href="#">Docs</a>
                    <button class="button_med" href="#">Login</button>
                </div>
            </nav>
        </header>
        <!-- Contents -->
        <section class="info">
                <h1 class="content_font1"><%=contentfont1 %></h1>
                <h4 class="content_font2"><%=contentfont2 %></h4>
                <div class="icons">
                    <div class="icon">
                        <img src="images/email.svg" alt="email">
                        <p class="icon_info">ajnesttheseries@gmail.com</p>
                    </div>
                    <div class="icon">
                        <img src="images/facebook.svg" alt="facebook">
                        <p class="icon_info">Aj. NesT the Series</p>
                    </div>
                    <div class="icon">
                        <img src="images/youtube.svg" alt="youtube">
                        <p class="icon_info">Aj. NesT the Series</p>
                    </div>
                    <div class="icon">
                        <img src="images/twitter.svg" alt="twitter">
                        <p class="icon_info">Aj. NesT the Series</p>
                    </div>
                </div>
        </section>
        <!-- Feature Bar -->
        <section class="features">
            <!-- Add Parameters that forEach loop -->
            <% obj_feature.forEach(function(feature){ %>
            <div class="feature">
                <img src= <%= feature.img %> alt="programming">
                <div class="feature_info">
                    <p class="feature_top"><%= feature.top %></p>
                    <p class="feature_bottom"><%= feature.bottom %></p>
                </div>
            </div>
            <% }) %>
            <!-- Comment not use
            <div class="feature">
                <img src="images/aiot.jpg" alt="aiot">
                <div class="feature_info">
                    <p class="feature_top">AIoT and Robotics</p>
                    <p class="feature_bottom">Enjoy Coding and Playing
                        Python, ROS, Mechanics</p>
                </div>
            </div>
            -->
            <div class="feature">
                <div class="feature_info">
                    <p class="feature_more">Learn More</p>
                </div>
            </div>
        </section>
    </main>
</body>
</html>
GitHub Source Code
https://github.com/ajnesttheseries/backandfrontend_nodejsejs
Assignment ให้ทำการเขียนโปรแกรมรับส่งค่า Parameters ของ Web Application ให้ครบถ้วน


